I have central air-conditioning in my apartment, and it’s controlled by a remote, employing IR signals to send commands to the A/C control unit.
As any decent geek would, I’d like to be able to control my A/C using other means (e.g., a smartphone).
In a previous post, I went into detail about reverse engineering the remote. Now it’s time to proceed to actually using these powers to replace the original A/C remote with my own Arduino-controlled thingie!
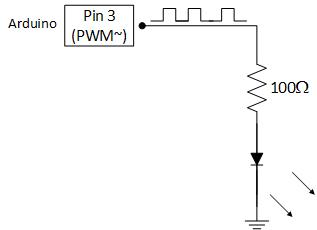
The gist: using an Arduino Uno board with a IR-LED circuit (see below), along with Ken Shirriff’s Arduino IRremote library (slightly modified), I was able to transmit the A/C commands that were analyzed in the previous post in lieu of the original remote.
-

- Arduino IR Transmitter Circuit
Keep reading for a full drill down, or jump straight into my home-control-arduino GitHub project for the actual code and documentation.
Building the IR Transmitter Circuit
Buy list:
- SparkFun Inventor’s Kit for Arduino (available in Israel via 4Project.co.il, or via friends who sell their own kits 🙂 (h/t YoniC) ) (also see a similar Arduino starter kit on Amazon
or on eBay
), that comes with Arduino UNO R3 (Amazon
, eBay
), breadboard and a convenient holder for both (and lots of other useful stuff to get you going).
- A simple IR LED (like this one, also from 4Project.co.il).
Assemble the components according to the schematic shown above, which will look something like this:
-

- Assembled Arduino IR transmitter circuit on breadboard
(side notes: I used three 330ohm resistors in parallel instead of a single 100ohm, because I only had 330ohm & 10kohm resistors; I also used two IR LEDs because I had two 🙂 )
Connect the Arduino to the PC via USB, and compile and upload my IRACsender sketch to the board:
-

- Uploading the IRACsender sketch from the Arduino IDE

Open the Arduino Serial Monitor, that will greet you with a welcome message:
-

- Arduino Serial Monitor: Welcome

Type a state-setting command and send it to the board (see the project README for details about the commands) – it will reply with feedback about the state changes:
-

- Arduino Serial Monitor: Set State

Type the IR transmission initiation command (S) to send the a preconfigured IR signal:
-

- Arduino Serial Monitor: Signal Transmitted

And there you have it – a working Arduino-powered IR transmitter that sends A/C commands that were previously analyzed and preconfigured in the IRACsender project.
Preconfiguring IR A/C Commands
As you can see in the code (relevant snippet below), each supported A/C command is represented by a large array – with the first element specifying the number of elements in the rest of the array, and the following elements specifying the duration (in microseconds) of consecutive IR marks and spaces, as described in the documentation of the Arduino IRremote library.
PROGMEM prog_uint16_t uSendBuff_Toggle_Cool_Auto_25[] = {181, 3000, 3700, 2050, 900, 1050, 1850, 1050, 850, 1100, 850, 2050, 900, 1050, 850, 1050, 900, 1050, 900, 1050, 1850, 1950, 1850, 2050, 850, 1050, 850, 1050, 900, 1050, 900, 1050, 900, 1050, 850, 1050, 900, 1050, 900, 1050, 900, 1050, 850, 1050, 900, 1050, 850, 1050, 900, 1050, 850, 1050, 900, 1050, 900, 1050, 900, 1050, 1750, 2050, 800, 3000, 3750, 2050, 900, 1050, 1800, 1050, 850, 1100, 800, 2050, 900, 1050, 850, 1050, 900, 1050, 900, 1050, 1800, 2000, 1850, 2050, 900, 1050, 850, 1050, 900, 1050, 900, 1050, 900, 1050, 800, 1050, 900, 1050, 900, 1050, 900, 1050, 850, 1050, 900, 1050, 900, 1050, 900, 1050, 800, 1050, 900, 1050, 900, 1050, 850, 1050, 1750, 2050, 850, 3000, 3750, 2050, 900, 1050, 1850, 1050, 850, 1100, 800, 2050, 900, 1050, 800, 1050, 900, 1050, 900, 1050, 1800, 2000, 1800, 2050, 900, 1050, 800, 1050, 900, 1050, 900, 1050, 900, 1050, 850, 1050, 900, 1050, 850, 1050, 900, 1050, 850, 1050, 900, 1050, 900, 1050, 900, 1050, 850, 1050, 900, 1050, 900, 1050, 900, 1050, 1750, 2050, 850, 3950};
PROGMEM prog_uint16_t uSendBuff_Leave_Cool_Auto_25[] = {187, 2950, 2850, 1000, 950, 1050, 900, 1050, 1850, 1000, 850, 1100, 850, 2000, 950, 1050, 850, 1000, 950, 1000, 950, 1050, 1850, 1950, 1850, 2000, 950, 1000, 850, 1000, 950, 1000, 950, 1050, 900, 1050, 850, 1000, 950, 1050, 900, 1000, 950, 1000, 850, 1050, 900, 1000, 950, 1000, 950, 1050, 850, 1000, 950, 1050, 900, 1050, 950, 1000, 1800, 2000, 900, 3000, 2850, 1000, 950, 1050, 900, 1000, 1900, 1050, 850, 1050, 900, 2000, 950, 1050, 850, 1000, 950, 1050, 900, 1000, 1900, 2000, 1850, 2000, 950, 1050, 850, 1000, 950, 1050, 950, 1050, 900, 1000, 900, 1050, 900, 1000, 950, 1000, 950, 1050, 850, 1000, 950, 1000, 950, 1050, 900, 1000, 900, 1050, 950, 1050, 900, 1000, 950, 1000, 1800, 2000, 900, 3000, 2850, 1050, 900, 1000, 950, 1000, 1850, 1050, 900, 1050, 900, 2050, 900, 1000, 900, 1050, 900, 1050, 950, 1000, 1900, 1950, 1900, 2050, 900, 1050, 900, 1000, 950, 1050, 900, 1000, 950, 1000, 850, 1050, 950, 1000, 950, 1000, 950, 1050, 850, 1000, 950, 1050, 900, 1050, 950, 1000, 900, 1050, 900, 1000, 950, 1000, 950, 1050, 1800, 2000, 850, 3900};
PROGMEM prog_uint16_t uSendBuff_Toggle_Cool_Auto_24[] = {181, 3000, 3750, 2000, 900, 1050, 1850, 1000, 850, 1100, 850, 2000, 900, 1000, 850, 1000, 900, 1000, 900, 1050, 1850, 1950, 900, 1050, 1850, 2000, 850, 1050, 900, 1000, 900, 1000, 900, 1050, 850, 1000, 900, 1050, 900, 1000, 950, 1000, 850, 1050, 900, 1000, 900, 1000, 900, 1050, 850, 1000, 900, 1000, 900, 1050, 900, 1000, 1800, 2000, 850, 3000, 3750, 2050, 900, 1000, 1850, 1000, 850, 1100, 850, 2000, 900, 1050, 850, 1000, 900, 1000, 900, 1050, 1850, 1950, 900, 1000, 1850, 2000, 850, 1000, 900, 1000, 900, 1050, 900, 1000, 850, 1000, 900, 1000, 950, 1000, 900, 1000, 850, 1000, 900, 1000, 900, 1000, 900, 1000, 850, 1000, 900, 1050, 900, 1000, 950, 1000, 1800, 2000, 850, 2950, 3750, 2000, 950, 1000, 1850, 1000, 900, 1050, 850, 2000, 900, 1000, 850, 1000, 950, 1000, 950, 1000, 1850, 1950, 950, 1000, 1850, 2000, 900, 1000, 950, 1000, 900, 1000, 950, 1000, 850, 1000, 950, 1000, 950, 1000, 900, 1050, 850, 1000, 900, 1000, 900, 1000, 950, 1000, 850, 1050, 900, 1000, 900, 1000, 900, 1000, 1800, 2000, 850, 3900};

prog_uint16_t * getAcSendBuff() {

if ( (Toggle == pwr) && (Cool == mode) &&(Auto == fan) && (25 == temp) ) { return uSendBuff_Toggle_Cool_Auto_25; }
if ( (Leave == pwr) && (Cool == mode) &&(Auto == fan) && (25 == temp) ) { return uSendBuff_Leave_Cool_Auto_25; }
if ( (Toggle == pwr) && (Cool == mode) &&(Auto == fan) && (24 == temp) ) { return uSendBuff_Toggle_Cool_Auto_24; }
return 0;
}
Following the hard-coded arrays, you can see a “selector-function”, that given a valid power-mode-fan-temp state returns a pointer to the array that represents that state.
This code could become hard to maintain, when supporting many A/C commands, which is the reason I decided to automate the generation of this code using my IRAnalysis Python script, that was mentioned in the previous post.
I will not reiterate the description of the script, so please refer to the previous post for further information on building and passing a data-set to the script. I will just add here the part that was not mentioned in the previous post – the script also has a code command (in addition to the graph command) that generates the code above, whose output can be pasted directly into the IRACsender project.
IRACsender Design Consideration
The program is a simple state-machine, with the state and parameters stored in global variables.
The basic (and initial) state is Ready. In that state, the program waits for a single character from the serial port that determines the transition to the next state:
- One of the characters
P,M,FandTtransits to a parameter-reading state (power toggle, A/C mode, fan speed, and temperature, respectively). - The character
Sinitiates an attempt to transmit an IR signal as defined by the state parameters that were set. - In the
P/M/Fparameter reading states, the program expects one ASCII digit representing the value for the parameter, as defined in the respective enums. - In the
Tparameter reading state, the program expects (exactly) two ASCII digits representing the desired temperature (this is actually implemented as two distinct states – read first digit, and read second digit).
In every state where some input is expected, if the character read is not valid in that state (e.g., not an ASCII digit in the allowed range), the state machine transits to Error. In Error state, the program will clear out the incoming buffer, and set back to Ready (but the global parameters will remain as they were before encountering the error).
Also, after transmitting an IR signal, the global parameters are NOT reset – they remain as they were, so further commands can be sent just by changing a selected parameter, and not setting all of them.
If the IR transmission command is initiated before all state parameters are set, the transmission fails and the state is set to Error.
Also – even if the parameters are set, but the IR signal representing this state is not defined by the hard-coded arrays, the transmission will fail and the state will be set to Error.
Finally, the program does its best to print back helpful messages, in happy flows as well as when errors occur.
Arduino Memory Caveats
During initial testing phases I implemented just one A/C command, with a single hard-coded array, declared simply with int sendBuff[] = { ... };, and it worked just fine.
When I advanced to three A/C commands, as shown in the examples above, suddenly the Arduino stopped behaving properly.
The symptoms were strange – compile and upload would complete successfully, but the program would just do nothing – not even the “Welcome” print in the setUp() function!
Common wisdom in such cases says: go back to the last working state, and try adding the changes one by one to see which one breaks.
This debugging technique didn’t fail here – I quickly found that with two hard-coded arrays everything works peachy, but adding the third one breaks it all.
Obviously this was not a problem with the specific array, because the program broke before even starting (but I still verified by checking that every combination of two commands works).
My experience in embedded development started shouting in my head – it must be memory-related!
And indeed, a short search reminded me that the Arduino UNO comes with just 2KB of SRAM memory, and by default all data segments (stack, heap, BSS) goes to SRAM, which fills up pretty quickly if I start using lots of big arrays… (and the symptoms match)
The same search also mentioned that that model is equipped with 32KB of Flash, and I can store my data in Flash instead of SRAM by using the PROGMEM keyword, and utilizing special functions to access that memory.
Conclusion
That sums up the drill down into my Arduino-powered A/C control project, building on the previous post about Arduino-powered IR analysis.
The project, along with detailed documentation, is available on GitHub for you to clone, fork, hack, modify and improve (and share back!).
Go ahead and read my other A/C-control project posts:


July 15, 2014
Hello,
why did you use 850nm LED? Does 940nm LED should work?
July 16, 2014
Hi,
I did not research the spectrum of the existing IR remote, so I don’t know what it’s central wavelegnth.
I chose the 850nm LED because the online spec described this one as appropriate for IR-remote projects, and eventually it seems to work fine 🙂
July 19, 2014
HI there,
this project looks COOL! i have some questions though. Can you be a little more specific on the python script? i tried to run it but nothing seems to happens. I don’t know where to put the Data files with the serial monitor output and what to expect as an outcome! i would be thankful if you could help! and maybe then some more questions might arrive!
July 21, 2014
Hey, thanks!
How are you trying to execute it?
Do you want to analyze IR readings? Or generate an Arduino code that sends IR commands?
August 12, 2014
hi all
i want to controll my aircoondtioner through freeduino with atmega328p-pu
even though i dumped the Aircodition transmitter code into the board , its not giving signals i mean i did nt found any led blinking , i think there is a problem with pwm pins , help me to activate pwm pins in freeduino , is any internal pins in freeduino help me to complete this project
August 12, 2014
Hi Sharif!
What code did you load to your board exactly?
Did you modify it to work with your setup and specific board?
How are you checking whether there is a signal it not?
I am not familiar with the freeduino, so I am not able to provide specific advice, or test it myself…
September 7, 2014
Hi Itamar,
i am trying to control my A/C via Arduino and i having some problems,
i want to ensure that i am doing everything right.
i am using Arduino ethernet, IR receiver is connected to port number 11, and IR led is connected to port number 3.
i already control my TV, now i want to do the same thing with my A/C.
so i took your code, and from what i understood i should use the IRACreceiver project in order to see the RAW code of the IR signal.
i used this get the RAW codes:
0x1188070 (32 bits)
Raw (100): -6488 9100 -4350 550 -600 550 -550 600 -550 550 -550 600 -550 600 -550 550 -550 550 -1650 600 -600 550 -550 600 -550 550 -1650 600 -1650 550 -600 550 -550 550 -600 600 -1650 550 -550 600 -550 550 -550 600 -550 600 -550 600 -550 550 -550 600 -550 550 -1650 600 -1650 550 -1650 650 -550 550 -550 600 -550 550 -550 600 -550 600 -550 550 -550 600 -550 600 -550 600 -550 550 -550 600 -550 600 -550 550 -550 600 -1650 600 -550 600 -1650 550 -550 600 -550 550 -550 600
then i put this RAW code in the “Leave-Cool-Auto-25” in the project, in order to use this python script that generate my arduino code.
i generated the following code:
PROGMEM prog_uint16_t uSendBuff_Leave_Cool_Auto_25[] = {99, 9100, 4350, 550, 600, 550, 550, 600, 550, 550, 550, 600, 550, 600, 550, 550, 550, 550, 1650, 600, 600, 550, 550, 600, 550, 550, 1650, 600, 1650, 550, 600, 550, 550, 550, 600, 600,1650, 550, 550, 600, 550, 550, 550, 600, 550, 600, 550, 600, 550, 550, 550, 600, 550, 550, 1650, 600, 1650, 550, 1650, 650, 550, 550, 550, 600, 550, 550, 550, 600, 550, 600, 550, 550, 550, 600, 550, 600, 550, 600, 550, 550, 550, 600, 550, 600, 550, 550, 550, 600, 1650, 600, 550, 600, 1650, 550, 550, 600, 550, 550, 550, 600};
and replace it in the uSendBuff_Leave_Cool_Auto_25 function in the IRACsender project.
then changed the code in order to execute only the my function:
just replace the “” to “prog_uint16_t * pfSendBuff = uSendBuff_Leave_Cool_Auto_25;”
i am trying to execute it in order to control my A/C, the IR pulse is sent, but it seems like the A/C is not really get the pulses…
i did something wrong? there is something i miss i think…
Thank you,
Barak.
September 7, 2014
Barak, it looks like an issue I experienced as well.
You’re getting a raw buffer of size 100. Did you apply the patch to the IRremote library that I mentioned in the previous post?
It changes the internal maximal buffer from 100 to 200.
It seems that this limitation is not enough for some A/C remote, like mine and yours.
September 7, 2014
Thank you very much Itamar!!!! i succeeded 🙂
November 22, 2015
Hi Itamar
I was finally able to get the IR code from the python script. After that I replace it in the uSendBuff_Toggle_Cool_Auto_25 function in the IRACsender project and I run the code , the IR pulse is sent, but it seems like the A/C is not responding at all.
Yes i did apply the patch to the IR remote library and changed the internal maximal from 100 to 200. Furthermore I am using the old compiler( i.e. Same as yours 1.0.5 ) so i didn’t had to change much code of IRACsender sketch.
I am trying to control York air-cons. Did i do something wrong? After setting the parameters it does say
Sending Ac paremeter——success
Any suggestions?
Thank you.
Josh
November 22, 2015
That’s good progress Josh! 🙂
I’m glad you didn’t run into Arduino compilation issues.
Now debugging the IR sending part can be a bit challenging. If the sketch prints “success” it means that it toggled the relevant I/O successfully according to the requested command. There are many things that can go wrong between that and the AC actually receiving the signal, and all of them are not really software-related, but more hardware / physical-world related.
November 26, 2015
Hi Itamar!
Still my air con is unresponsive. I have tested the circuit and also tested whether the IR Led is sending the same code as the remote. Yes they both were sending the same. So i have found out that my remote send raw data which is more than 255 but unfortunately we can only limit the rawbuff in the library to a maximum value of 255 because of 8 bit arduino.
Any suggestion on how to Hack IR which are more than 255? I found this tutorial on Internet
https://github.com/z3t0/Arduino-IRremote/issues/194
but I am unable to understand the tutorial. Any other suggestion besides this way?
I am asking for your suggestion as I feel you provide great analysis as well as simple instruction and your codes are easier to understand also.
Thank you
Josh
November 29, 2015
Hi Josh!
From the issue you linked to, I think I understand that the
lenparameter of theIRsend::sendRawfunction of the IRremote library used to beunsigned char, which limited us to sending up to 255 symbols of raw data. Looking at the current code of the library (see https://github.com/z3t0/Arduino-IRremote/blob/master/irSend.cpp), this is nowunsigned int, which is 2 bytes (e.g. up to 65535 on Arduino UNO, according to https://www.arduino.cc/en/Reference/UnsignedInt), which should remove this limitation.My guess is that your version of the IRremote library is from before this change. From the blame view I can see that this was changed on August 20, so if you downloaded the library before that, you have
unsigned char.I suggest you either download the latest library, or manually edit the code you have from
chartoint.March 15, 2016
Hi Can I just Check that is there like specific frequency beep to specific brand of air-corn we are controlling ?
March 17, 2016
Yes, you can do signal processing to detect specific frequency beeps, depending on the AC brand. That’s exactly what I did, as described in one of the other posts in this series 🙂